In this tutorial I have explain how integrate UPI android app into our any type of application. The help of UPI payment service we able to do more services, that’s why here I make this article. Already we have uploads so many articles for integrate the online payment gateway. Which is helps to collect payments from users or customers.
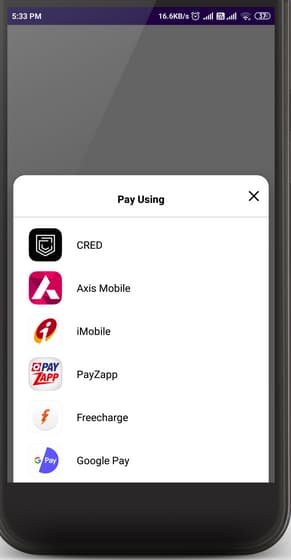
Here we explain about UPI like how directly collect the payments into UPI application. For example Google Pay, PhonePe, Paytm and more apps are currently helps to transfer our money without going bank. So at the end of article you can also get some idea for how create own Unified payment interface application. But for that we need to ask some permission from third parties who provide REST API services.
Then only we able to working with UPI apps and communicate with payments apps. If you are understand the topic then deploy the apps on play store. And through this generate passive income without any further investment or more works.
Once you are done then easily able to follow the further steps for new apps. For example if you are plan to create new payments app like Google Pay, then you can do this when activate the API. It’s not a easy task, you need strong knowledge in Java program. Because here we are using Java as a back-end level & the database is SQLite & Firebase.
UPI Initialization
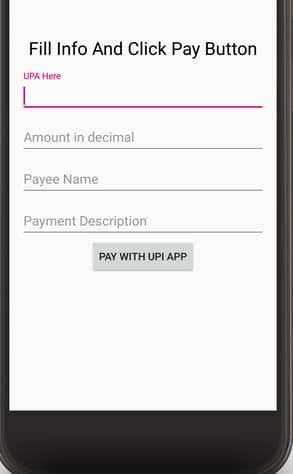
First we have to initialize the UPI apps id then only receive & send the payments. On the other hand we have to give our bank details like account holder name, account number, IFSC code and more information. After that it’s successfully connected to our application with UPI feature.
IndiUpi indiUpi = new IndiUpi.Builder()
             .with(this)
             .setPayeeVpa("payee@upi")
             .setAmount("AMOUNT_IN_DECIMAL")
             .setPayeeName("payee name")
              .setDescription("DESCRIPTION")
              .setTransactionId("UNIQUE_TRANSACTION_ID")
              .setTransactionRefId("UNIQUE_TRANSACTION_REF_ID")
	.setUrl("HTTP_OR_HTTPS", "WWW.EXAMPLE.COM", "API.php")
                .build();
This is just demo purpose, check source code section for more integration steps. Then only we have successfully build the UPI application. Otherwise getting critical errors when try to make the server side payments. But it’s working fine on client side, whenever errors are listed on our code. Therefore we have to implement the database code in server side.
Features
- User Friendly Navigation
- Material Design
- Native
- Gift Cards & Cashback Offer
- Integrate with all bank (private & government)
- Supports all payment methods.
- Authentication verification to activate the UPI id for accept the payments.
- Communicate with bank management team members for the purpose support.
Integrate UPI Android App Screenshot
Check the below screenshot file. For more file, you have to download the source code in end of the article. However these are screenshot enough to check the project condition & structure. Because we need only concept & design is not important. Later that we have to customize the design with extra added plugins.

Source Code
I hope above all UPI payment queries & images are helps to build the application. Moreover for the full clarification you have to install our other source code which is related to payment gateway service. Similarly every gateway integration code’s are perfectly matched into other providers. So you can easily build your own application after connect the UPI apps.