Adding fragment to Activity in Android – In this application I will show how to add fragment to activity in android. Most of developers used in this concept for client requirements. Read official documentation add fragment to a activity, it requires a one container to get the values. In that container access to be Framelayout with added to be XML or you can use the default container.
Fragment is must important for learn the code in different manner. Because during the app development, we have to face lot of third party library files to solve the issues. Already we are uploads tutorials related to how use Recyclerview with simple example.
So once check the article if you have no idea in recyclerview. Because it’s very mandatory for every android application. Through this only we align our code in neat way, otherwise it’s collapsed like a jam of results. Similarly one by one you can start your learning skills, after few months you are master in android domain.
These days college students are like to learn android app development tutorials. Behind the reason is software companies are maximum hire android develop who have good knowledge in Java or Python program. Alternatively with help of Flutter framework also we able to develop both of Android & iOS application.

Adding fragment to Activity in Android
Below i will show you how to add the fragment into an activity dynamically. Actually fragment used for make a user interface and contributes it’s own layout of the activity. You have must provide a layout for a fragment, to implement the onCreateView() callback method.
Create New Project
Okay fine, now time to make android app in add fragment to activity xml. In same way create new project and give some name for the project & choose the Empty Activity for that.
After creating project just move on the activity_main.xml file and add the following code. The code is,
<?xml version="1.0" encoding="utf-8"?>
<RelativeLayout xmlns:android="http://schemas.android.com/apk/res/android"
    xmlns:tools="http://schemas.android.com/tools"
    android:id="@+id/activity_main"
    android:layout_width="match_parent"
    android:layout_height="match_parent"
    android:paddingBottom="@dimen/activity_vertical_margin"
    android:paddingLeft="@dimen/activity_horizontal_margin"
    android:paddingRight="@dimen/activity_horizontal_margin"
    android:paddingTop="@dimen/activity_vertical_margin"
    tools:context="in.vetbossel.fragmentactivity.MainActivity">

    <Button
        android:id="@+id/btn_load"
        android:layout_width="fill_parent"
        android:layout_height="wrap_content"
        android:text="@string/str_btn_load"
        />

    <LinearLayout
        android:id="@+id/fragment_container"
        android:layout_width="fill_parent"
        android:layout_height="wrap_content"
        android:orientation="vertical"
        >
    </LinearLayout>
</RelativeLayout>
Create another XML file
You have to create another xml file. The xml file name like hello_fragment_layout.xml. After creating xml file just add the following code. The code like,
<?xml version="1.0" encoding="utf-8"?>
<LinearLayout xmlns:android="http://schemas.android.com/apk/res/android"
    android:layout_width="match_parent"
    android:layout_height="match_parent">
    <TextView
        android:layout_width="wrap_content"
        android:layout_height="wrap_content"
        android:layout_gravity="center_horizontal"
        android:text="@string/str_tv_fragment"
        />

</LinearLayout>
Hereafter, open res/strings.xml file and add the following code. The code is,
<resources>
    <string name="hello">Hai</string>
    <string name="app_name">FragmentActivity</string>
    <string name="str_btn_load">Load Fragment</string>
    <string name="str_tv_fragment">Hai, This is called fragment</string>
</resources>
Add fragment to Activity in Android
Now you to move on the MainActivity.java file & add the following code. The complete code of MainActivity is,
package in.vetbossel.fragmentactivity;

import android.app.Activity;
import android.app.FragmentManager;
import android.app.FragmentTransaction;
import android.os.Bundle;
import android.view.View;
import android.view.View.OnClickListener;
import android.widget.Button;

public class MainActivity extends Activity {
    /** Called when the activity is first created. */
    @Override
    public void onCreate(Bundle savedInstanceState) {
        super.onCreate(savedInstanceState);
        setContentView(R.layout.activity_main);

        Button btnLoad = (Button) findViewById(R.id.btn_load);

        OnClickListener listener = new OnClickListener() {

            @Override
            public void onClick(View v) {
                FragmentManager fragmentManager = getFragmentManager();
                FragmentTransaction fragmentTransaction = fragmentManager.beginTransaction();
                HelloFragment hello = new HelloFragment();
                fragmentTransaction.add(R.id.fragment_container, hello, "HELLO");
                fragmentTransaction.commit();
            }
        };

        btnLoad.setOnClickListener(listener);

    }
}
Create New Java Class
After making MainActivity.java file, you have to create one class the class name like HelloFragment.java. The code is,
package in.vetbossel.fragmentactivity;

/**
 * Created by VETRI on 11-03-2017.
 */
import android.app.Fragment;
import android.os.Bundle;
import android.view.LayoutInflater;
import android.view.View;
import android.view.ViewGroup;

public class HelloFragment extends Fragment {
    @Override
    public View onCreateView(LayoutInflater inflater, ViewGroup container, Bundle savedInstanceState) {
        /** Inflating the layout for this fragment **/
        View v = inflater.inflate(R.layout.hello_fragment_layout, null);
        return v;
    }
}
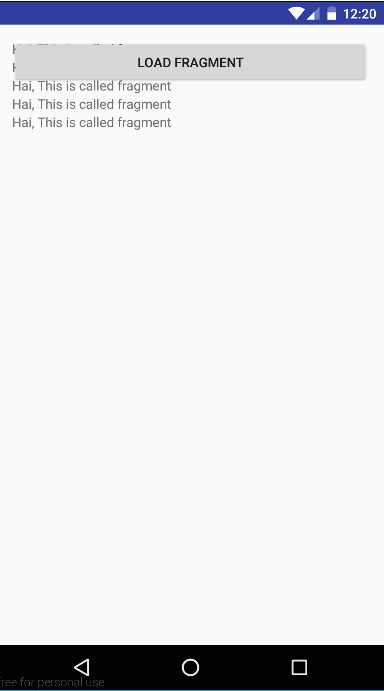
Test the Application
Now time to run your application in android emulator. The exact output like below image,